March 31, 2014

Perfect Paper Crafting and Sugarpea Designs Blog Hop

Hey peeps.  I hope everyone is having a great day.  Perfect Paper Crafting and Sugarpea Designs have teamed up to have a fabulous blog hop this week.  So sit back and grab your favorite beverage.  It's going to be a great hop.

If you are just starting you don't want to miss anything so head back to the beginning of the hop to catch all the fantastic creations we have to show you.  If you are already on your way, you should of arrived here from Kat's blog.

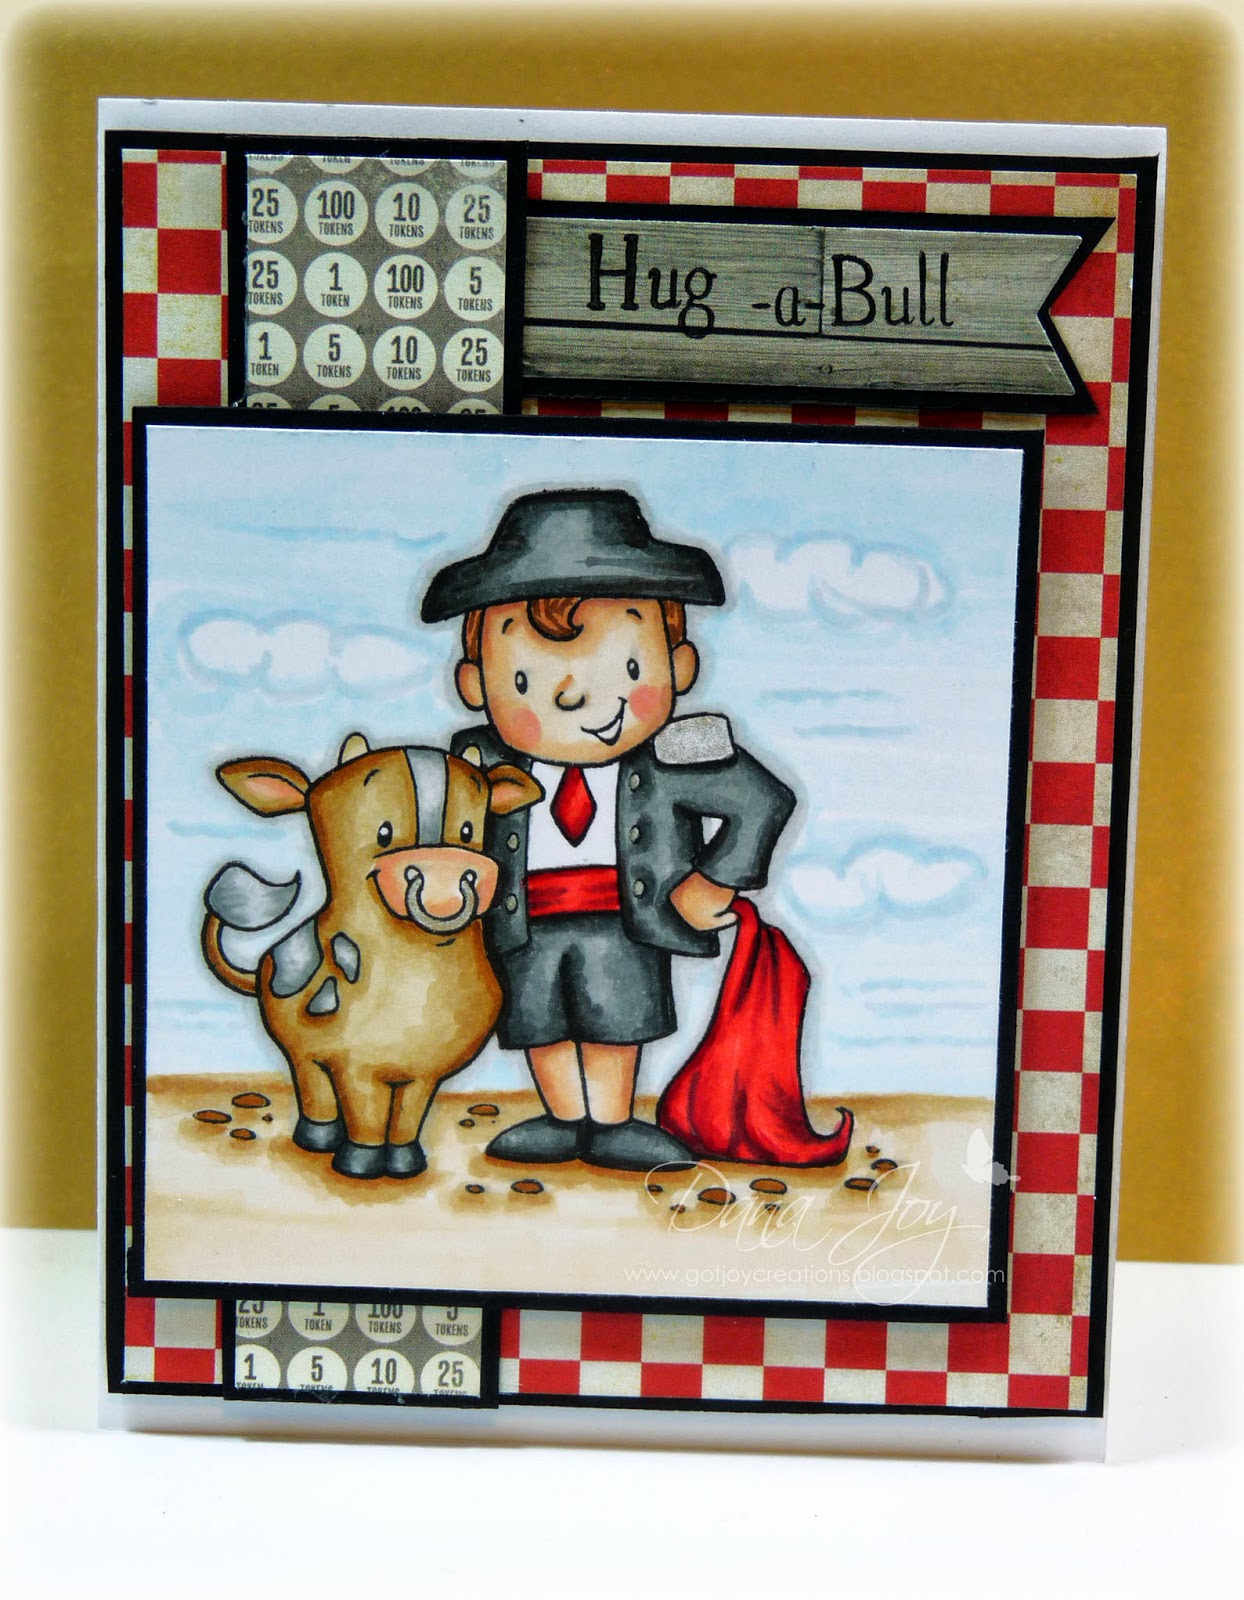
My card is featuring the adorable set from Sugarpea Designs called Tin Can Chat.  Aren't these girls just too cute?!  Now here is where the fun begins as you start to pick your paper and layer your images.  I used the Perfect Layers Mini Tool and the Perfect Cutting Mat to created this multiple layered background.  With this tool it is super easy to have perfect layers with no measuring.  Now that's what I call a "perfect" tool.    

SugarPea Designs is giving away a $25 gift certificate to their new on-line store to one lucky winner.  Also to celebrate our very first Perfect Paper Crafting Brand Ambassador blog hop, Perfect Paper Crafting will be giving away a $50 gift certificate to our on line store. All you have to do is visit all of the participating blogs and leave a comment on every single one. We will announce the winner Sunday, April 6. I hope you enjoy!

Now it's time to hop on over to Kristie's blog to see what she has come up with.  Happy hopping everyone.  Good luck on winning!

Hugs and love~


Follow on Bloglovin

March 28, 2014

Sparkling Friday Afternoon

Hey peeps.  Happy Friday.  I'm back with a quick card I made for the MFT and Simon Says Stamp challenges.  What should of took me no time to do took me forever today.  Since I was following the sketch and color challenge for MFT I thought heck I can crank this card out really quick.  NOPE!!!  Not today!  It took me AGES to get this card done.  First my glitter spilled everywhere. Then I couldn't get my die cuts to cut out right.  Man, I was totally frustrated.  Anyway, it's DONE finally.

I used the Hibiscus and Label 3 stax die cuts from MFT for the flower and sentiment area  The diagonal background was made from the PTI Stripes Diagonal die. I didn't just want to stamp Happy Birthday so I chose to use the happy die from Simon Says Stamp Happy Birthday die set and the sentiment from the Celebrate Big stamp set from MFT.

Now I need to go and clear all this darn glitter from my desk.  I'm sure the dog will have glitter on her as well.  I do love glitter but I hate the mess it can make at times.  See ya back here soon.

Hugs and love~


Follow on Bloglovin

March 27, 2014

Keep On Keepin' On

Hey peeps.  Well here is my last card for the Clean and Simple Card Class.  I didn't complete all my assignments (shh..don't tell) but I will by this weekend.  I loved taking this class as it took me back to some techniques I haven't used in awhile.

The sentiment on this card is from the Mama Elephant's Hustle stamp set.  I LOVE this sentiment.  Makes me want to break out in a 70's move.  LOL  I created the stars and circled with my Memento Luxe ink pads and stamps from Art Warehouse Holiday Interactive Circles set. After everything is stamped I laid down some double sided tape and sprinkled on some glitter.  Sparkles!!!!! :-)


Thanks for stopping by today.  I hope you are hustling nicely into Friday!!  See ya back soon!

Hugs and love~


Follow on Bloglovin

March 26, 2014

Stamping With The Spouses

Hey peeps.  Seems like I haven't posted in months.  I know...it's only been a couple of days. :-)  I wanted to show  you a card we made last night.  I enjoy the company of some really fabulous ladies once a month for dinner.  So last night, we had dinner and stamping.  Some of the ladies had never stamped before so this was great fun watching them create.  I wanted to show a really easy card that can be created without having to pull out the big guns like embossing powder, multiple layers and stencils. 

The ladies really enjoyed themselves and I was so honored to "teach" my little hobby to them.  At the end of the night I gave them all a little card from me to them.  Just my way of showing these beautiful ladies just how much they mean to me. 

Well, I crawling back into bed as this is not a very productive day. But I will have some AMAZING news to share with you in just a few days.  I'm so excited but you'll have to hold on.  I promised I wouldn't spill the beans. ;-)

Hugs and love~


Follow on Bloglovin

March 21, 2014

Oh Snap It's Your Birthday

Hey peeps.  Happy Friday.  Well it's the wee hours of the morning and I couldn't sleep so I wondered down to my stamp room and made a card for a few challenges I wanted to participate in.

I pulled this image from Jess College Fund out of my colored image box and got busy with the layout for my  card.  The challenge over at Sketch N Stash was perfect for this image and the Tuesday Throwdown tic-tack-toe challenge was just what I needed to make this card complete. But the best part, I'm entering it in Jess challenge to win some Copic markers.  I mean really, who wouldn't love to have more markers to color with?

I colored the Jess Taking Pictures image with my Copic markers and matched her with Oh Life paper from Simple Stories.  I have multiple sets of this paper pack because I love all the cool papers and colors.

We I'm off to try and get some kind of sleep this morning. I have to be up in less than 6 hours for a medical appt.  I might end up falling asleep in the doctor's chair.  Oh, wouldn't that be interesting.  LOL

Hugs and love~


Follow on Bloglovin

March 20, 2014

Two Types of Embossing - What a difference it makes

 Hey peeps.  I'm back with two more cards from class.  I have some catching up to do so I thought I would post both of my embossed cards at one time.

For the first one, we had to dry emboss our cards.  I love this technique.  To achieve this look you must use an embossing folder and a solid die cut.  Once you have embossed your card, you can add color by placing it in the "hollow" areas of your cad.  Great effect with very little effort.


For my next card, we used embossing paste.  Well in my case I didn't have embossing paste so I used good ole' fashion light weight spackling from Lowes.  It worked just the same as the embossing powder and I think the texture is better.  I would definitely be using this technique again and again.  Makes a textured background really pop.

Well thanks for stopping by today.  Not feeling so well so off to bed I go.  Hopefully whatever has a hold of me will let go soon. 

Hugs and love~


Follow on Bloglovin

March 19, 2014

Tracing Images

Hey peeps.  Happy hump day!  I'm still pressing away on my homework and I just finished this card after spending most of my day in bed yesterday.  It's such a bummer when you don't feel good.

Anyway, enough about that.  The technique I'm showing you today is called Tracing Images.  To make an extremely long process short, you stamp your background with a large image that has some kind of design.  Next you outline certain sections of the image and color it in.  Hope I didn't lose you on that.  LOL  I can't remember the name of the company that this image is from.  I used a silver sharpie to outline the flowers and colored them with BG11, BG13 and BG15 Copic markers.  
And of course I needed a wee bit of sparkle. Okay maybe not a wee bit.  Can you see all the sparkle on this card.  I couldn't stop myself from using my Wink of Stella pen.  This picture really doesn't show off the real sparkle.  I might just have to keep this card for myself.  LOL  The sentiment came from the Thanks sentiment set from Simon Says Stamp. 


Well, off to bed I go.  Hopefully I have exhausted myself into sleep mode.  Have a fabulous Wednesday everyone. 


Follow on Bloglovin

March 18, 2014

Rainbow Thanks

Hey peeps.  Sending a HUGE thanks out to everyone who wished me and my twin happy birthday yesterday!  Didn't really do much but I did get to have my Shamrock Shake! :-)  Hope it's a zillion calories but well worth every sip. 

The Thanks card I made was using a technique that we learned in class yesterday.  So much fun to create.  I'm telling you, if you haven't taken one of these classes you sure are missing out on the fun.  You learn so many techniques and meet some fabulous people.  I can see using this rainbow effect on a bunch of cards that I need to mass produce. I didn't have the dies that were used in class so I cut out the sentiment and the hearts with my Silhouette.  I think they came out pretty darn good if I say so myself. 

On another note...make sure you swing by Party Time Tuesdays to join us in the pet challenge.  We would love to see what you can come up with.  I'm sure it will be fantastic.

Gotta run peeps but come back and see me again real soon.  I'll miss ya!

Hugs and love


Follow on Bloglovin

March 17, 2014

Happy Birthday to ME!

They say it's your birthday.  Well it's my birthday too!!!  Yup, It's my birthday!!  And I have a twin so it's her birthday too!  LOL  Happy birthday DeDe!  For our birthday I thought I would make a card with the big hugs die.  I've fallen in love with this die cut. I covered a scrap piece of paper with washi tape, laid down my die and ran it through my Cuttlebug.  The card base really needed something to keep it from looking so plain, so I stamped a border with MFT darling dots stamp.  Then heat embossed it with clear embossing powder.  Next I flicked on some washed out white enamel accents with a small paintbrush.  To finish off my card I stamped the sentiment from My Mind's Eye and heat embossed it with Zing opaque white embossing powder.  My heat gun has been rather busy. 

If you see my twin today give her a hug from me. It stinks that I don't live in the same state.  Thank goodness their is FaceTime.  Catch ya later DeDe for a drink or two. ;-)


Hugs and love~


Follow on Bloglovin

March 16, 2014

Hug-A-Bull + A Video

Hey peeps.  Just couldn't resist showing you this card I made with the new set stamp called Hug-A-Bull from Sugarpea Designs.  I had a flippin' blast coloring this image.  I mean that bull is the cutest darn thing ever!  Hell, I would let it chase me around if it was that cute.  I colored the image with my Copics markers as soon as it came in the mail.  Remember what I said about having images already done and matched with paper.  Viola, I had him all ready to join in on the Anything Goes Challenge at Sugarpea Designs.

The paper is MME Dilly Dally and it's all mounted on SU Black.  I used my Perfect Layers Mini tool to mat all the layers.  This tool has a permanent place on my stamp desk now.  Here a little video I made using this adorable set and the mini tools.


Well I'm running out of steam so I guess that means it's off to bed for me.  Swing back tomorrow to see another "hug" card.  I'm just so darn hug-a-bull these days. ;-)

Hugs and love~


Follow on Bloglovin

Graffiti Stamping

Hey peeps.  Welcome back and thanks for hanging out with me today.  I'm back with a homework card.  Yup, the best kind of homework ever!  In the Clean and Simple Class we learned a technique called Graffiti Stamping.  I'm fond of this because you get to stamp away with different sentiments on the front of your card.  I used my Simon Says Stamp big hugs die cut for this card.  I cut it twice, once in the plain white cardstock and then again in SU Orchid Opulence cardstock.  After I assembled the card I didn't like the plain purple cardstock so I used a black sharpie to make dots.  Then all you have to do to finish the card is stamp your random sentiments over the die cut.  Super quick and easy card with one heck of a "wow" factor.  I can't wait to try this again with designer paper.

Well, I must run.  Trying to enjoy the last day of me being 44.  Tomorrow is my birthday and I if God finds it to be true I will be welcoming in the fabulous age of 45! 

Hugs and love~


Follow on Bloglovin

March 15, 2014

Just Sit Back and Relax

Hey peeps.  Oh the sun is shining and the grass is now cut.  Hubby is ready for the spring!  And I'm...well relaxing in the house.  LOL

There's a new challenge up at CMC and we are ready for you to show some skin!  That's right, let's see it...don't be shy!  Okay, maybe not your skin just some "skin" on your colored images.  You can smile now.  This young lady relaxing is called HIC...oooops and is from the Digistamps4Joy store.  The more I look at this image, the more I think that will be me around 10:00 tonight!  Hey,  it's St. Patrick's Day weekend and my birthday is on St. Patrick's Day.  Come on...cut me some slack! ;-)

Hope you join in on the challenge.  The challenge will run thru March 28th.  If you are the lucky winner, you can own this image using the gift certificate prize from this challenge.  How can you beat that?

Hugs and love~


 Follow on Bloglovin

March 14, 2014

Floral Stamping

Hey peeps.  Happy Friday.  I'm playing catch up with my homework.  Yesterday was a busy day with appointments so I didn't have time to get my work done.

Anyway, here are two more techniques that we learned in class this week.  The first one is masked background.  There's a lot of work that goes into a card like this but I love the way it turned out.  You end up looking like you used designer paper but it is all stamped with little floral images such as leaves and flowers.  To add color around the flowers, you must spritz it will color.  I didn't have a large enough banner so I cut both of them out from my Silhouette.  Lesson learned, invest in some masking paper.  I used Mask-It and ended up tearing on me.


Now, this card I love!  This technique is called stamped layering.  You first stamp out a very like background and then go in with other stamps in brighter colors overlapping them a little bit.  I didn't have circles like they used in class so I pulled out my Verve Dream Big stamp set.  The ink is from my distressed inks collection. 


Now it's time to look at today's work and hopefully get back in my room to get that completed.  Whew, I need to take a break!  My head is spinning!  LOL

Have a great weekend everyone.  Be safe.  And for you St. Patrick's Day party people, have a drink with me.  My birthday is St. Patrick's Day so this is the weekend to go all out!  ;-)

Hugs and love~


Follow on Bloglovin

Going Green

Hey peeps.  Happy Friday.  Since we are sooo close to St. Patrick's Day (which happens to be my birthday :-P) I thought I would jump in on the all green challenge over at AJVD.

I pulled out my MFT star stencil and got to work.  I used several shades of green from my Tim Holtz distress inks.  This was a super easy and quick card to put together.  The sentiment from The Stamping Studio was heat embossed with white embossing powder.  The little enamel dots I made with my Viva pearl pen and colored them green with my Copic marker.

Hope you enjoyed your visit today.  Now go forth and have an amazing weekend.  Be safe out there.

Hugs and love~


Follow on Bloglovin

March 13, 2014

Still Going - Blog Hop for Perfect Paper Crafting and Serendipty Stamps

Hey peeps!  So glad you stopped by today.  The blog hop is still going on for Perfect Paper Crafting and Serendipty Stamps. I wanted get one more card done showcasing the beautiful Floral Butterfly Stamp And Die Set. I am in LOVE with this set. I used watercolor paper to get the multicolored butterfly. 

First I colored some stripes of ink on two small pieces of watercolor paper using my Impress Dual Makers. The first top butterfly was cut using the solid die from this set.  The bottom one was cut using the detailed butterfly die. I cut a second solid butterfly from black cardstock and glued the detailed butterfly on it. Then I inked up the butterfly stamp with Versafine onyx black ink and stamped it on the colored butterfly.   What a striking color combo. 

I used my Perfect Layers mini tool to layer two pieces of Bazzill cardstock for my background.  I then decided that I needed a piece of cardstock to breakup the card.  I used my EK Success punch to make that happen.  The sticker sentiment came from a sticker roll carried in the Serendipty shop. I added some gems I had in my stash and my card was complete.

Hope you enjoyed your visit today.  Make sure to swing back by tomorrow as I have another card right in time for St. Patricks' Day!  You won't want to miss it.

Hugs and love~


Follow on Bloglovin

March 12, 2014

Say It With Flowers

Hey peeps.  Well I'm working hard on my homework tonight.  I didn't feel well all day so it has kept me out of my stamp room.  Anyway, here is a card I made using the masked frame technique I learned in class.  This is just a great way to get the feel of pattern paper without having pattern paper.  Who ever thought oft his is genius!  LOL

The colors I used work perfectly with the color challenge over at My Favorite Things.  Look it there...one card two entries.  I like it. ;-)  Just in case you are wondering the background stamp is from Impressions Obsessions called C-A-C Tapestry 2 and the sentiment is from MFT Contemporary Roses set.

Well back to bed I go.  Hopefully I can get a good nights sleep. 

Hugs and love my little peeps!


Follow on Bloglovin
Related Posts Plugin for WordPress, Blogger...